What is a Site-to-site IPsec VPN and why to use it?
A virtual private network (VPN) extends a private network across a public network, and enables users to send and receive data as if their computers were directly connected to the private network. A site-to-site VPN allows offices in multiple fixed locations to establish secure connections with each other over a public network. Site-to-site VPN extends the company’s private network, making computer resources from one location available to employees at other locations. An example of a company that needs a site-to-site VPN is a growing corporation with dozens of branch offices around the world.
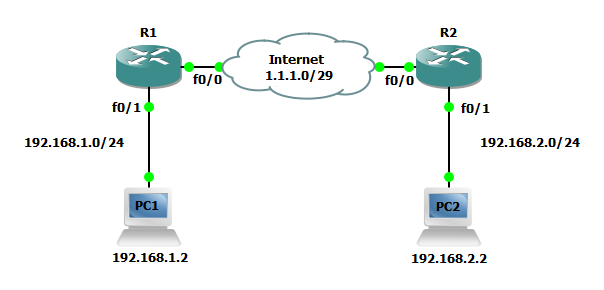
In the example below we will configure two routers that will serve as both Internet routers and terminate site-to-site VPNs. Users sitting behind these routers must be able to reach other site and any new networks provisioned in either site should be advertised to the router is the opposite site automatically. Users in either location must only be allowed to access the site using approved protocols such as FTP, HTTP, DNS, etc. Lastly, each router must be configured for a firewall to protect the device and users from Internet attack without impeding the ability to establish a site-to-site VPN.

Steps to configure a Site-to-site IPsec VPN
R1(config)#interface FastEthernet0/0
R1(config-if)#ip address 1.1.1.1 255.255.255.248
R1(config-if)#ip nat outside
!
R1(config)#interface FastEthernet0/1
R1(config-if)#ip address 192.168.1.1 255.255.255.0
R1(config-if)#ip nat inside
!
R1(config)#ip nat inside source list 101 interface FastEthernet0/0 overload
!
R1(config)#access-list 101 deny ip 192.168.1.0 0.0.0.255 192.168.2.0 0.0.0.255
R1(config)#access-list 101 permit ip 192.168.1.0 0.0.0.255 any
R2(config)#interface FastEthernet0/0
R2(config-if)#ip address 1.1.1.2 255.255.255.248
R2(config-if)#ip nat outside
!
R2(config)#interface FastEthernet0/1
R2(config-if)#ip address 192.168.2.1 255.255.255.0
R2(config-if)#ip nat inside
!
R2(config)#ip nat inside source list 101 interface FastEthernet0/0 overload
!
R2(config)#access-list 101 deny ip 192.168.2.0 0.0.0.255 192.168.1.0 0.0.0.255
R2(config)#access-list 101 permit ip 192.168.2.0 0.0.0.255 any
Step 2: Configure a crypto isakmp policy and set the crypto isakmp pre-share key on R1 and R2.
R1(config)#crypto isakmp policy 1
R1(config-isakmp)#encr 3des
R1(config-isakmp)#authentication pre-share
R1(config-isakmp)#group 2
!
R1(config)#crypto isakmp key vpnpasswordhere address 1.1.1.2
R2(config)#crypto isakmp policy 1
R2(config-isakmp)#encr 3des
R2(config-isakmp)#authentication pre-share
R2(config-isakmp)#group 2
!
R2(config)#crypto isakmp key vpnpasswordhere address 1.1.1.1
Step 3: Configure a crypto ipsec transform-set, crypto ipsec profile, crypto map, and access-list on R1 and R2 allowing only the local traffic to the remote network across the site-to-site VPN.
R1(config)#crypto ipsec transform-set TS-S2S-VPN esp-aes esp-sha-hmac
R1(cfg-crypto-trans)#mode transport
!
R1(config)#crypto ipsec profile IPSEC-S2S-VPN
R1(ipsec-profile)#set security-association lifetime seconds 86400
R1(ipsec-profile)#set transform-set TS-S2S-VPN
!
R1(config)#ip access-list extended VPN-TRAFFIC
R1(config-ext-nacl)#permit ip 192.168.1.0 0.0.0.255 192.168.2.0 0.0.0.255
!
R1(config)#crypto map IPSEC-SITE-TO-SITE-VPN 10 ipsec-isakmp
R1(config-crypto-map)#set peer 1.1.1.2
R1(config-crypto-map)#set transform-set TS-S2S-VPN
R1(config-crypto-map)#match address VPN-TRAFFIC
R2(config)#crypto ipsec transform-set TS-S2S-VPN esp-aes esp-sha-hmac
R2(cfg-crypto-trans)#mode transport
!
R2(config)#crypto ipsec profile IPSEC-S2S-VPN
R2(ipsec-profile)#set security-association lifetime seconds 86400
R2(ipsec-profile)#set transform-set TS-S2S-VPN
!
R2(config)#ip access-list extended VPN-TRAFFIC
R2(config-ext-nacl)#permit ip 192.168.2.0 0.0.0.255 192.168.1.0 0.0.0.255
!
R2(config)#crypto map IPSEC-SITE-TO-SITE-VPN 10 ipsec-isakmp
R2(config-crypto-map)#set peer 1.1.1.1
R2(config-crypto-map)#set transform-set TS-S2S-VPN
R2(config-crypto-map)#match address VPN-TRAFFIC
Step 4: Configure the tunnel interface and assign the crypto map the WAN interface that will establish the site-to-site VPN.
R1(config)#interface Tunnel0
R1(config-if)#ip address 172.16.0.1 255.255.255.0
R1(config-if)#tunnel source 1.1.1.1
R1(config-if)#tunnel destination 1.1.1.2
R1(config-if)#tunnel protection ipsec profile IPSEC-S2S-VPN
!
R1(config)#interface FastEthernet0/0
R1(config-if)#crypto map IPSEC-SITE-TO-SITE-VPN
R2(config)#interface Tunnel0
R2(config-if)#ip address 172.16.0.2 255.255.255.0
R2(config-if)#tunnel source 1.1.1.2
R2(config-if)#tunnel destination 1.1.1.1
R2(config-if)#tunnel protection ipsec profile IPSEC-S2S-VPN
!
R2(config)#interface FastEthernet0/0
R2(config-if)#crypto map IPSEC-SITE-TO-SITE-VPN
Step 5: Configure a EIGRP routing process on each router advertising local networks and tunnel networks.
R1(config)#router eigrp 101
R1(config-router)#network 172.16.0.0 0.0.0.255
R1(config-router)#network 192.168.1.0
R2(config)#router eigrp 101
R2(config-router)#network 172.16.0.0 0.0.0.255
R2(config-router)#network 192.168.2.0
Configure a Zone-Based Firewall
R1(config)#zone security INTERNET
!
R1(config-sec-zone)#zone security LAN
!
R1(config)#zone security S2SVPN
!
R1(config-sec-zone)#interface Tunnel0
R1(config-if)# zone-member security S2SVPN
!
R1(config)#interface FastEthernet0/0
R1(config-if)# zone-member security INTERNET
!
R1(config)#interface FastEthernet0/1
R1(config-if)# zone-member security LAN
R2(config)#zone security INTERNET
!
R2(config-sec-zone)#zone security LAN
!
R1(config)#zone security S2SVPN
!
R2(config-sec-zone)#interface Tunnel0
R2(config-if)# zone-member security S2SVPN
!
R2(config)#interface FastEthernet0/0
R2(config-if)# zone-member security INTERNET
!
R2(config)#interface FastEthernet0/1
R2(config-if)# zone-member security LAN
Step 7: Create a class-map, policy-map, and zone-pair to allow traffic from the local LAN to the Internet.
R1(config)#class-map type inspect match-any LAN-ALLOWED-PROTOCOLS
R1(config-cmap)#match protocol icmp
R1(config-cmap)#match protocol dns
R1(config-cmap)#match protocol ftp
R1(config-cmap)#match protocol https
R1(config-cmap)#match protocol http
R1(config-cmap)#match protocol tcp
R1(config-cmap)#match protocol udp
!
R1(config)#policy-map type inspect LAN-TO-INTERNET-POLICY
R1(config-pmap)#class type inspect LAN-ALLOWED-PROTOCOLS
R1(config-pmap-c)#inspect
R1(config-pmap)#class class-default
R1(config-pmap-c)#drop
!
R1(config)#zone-pair security ZP-LAN-TO-INTERNET source LAN destination INTERNET
R1(config-sec-zone-pair)# service-policy type inspect LAN-TO-INTERNET-POLICY
R1(config)#class-map type inspect match-any LAN-ALLOWED-PROTOCOLS
R2(config-cmap)#match protocol icmp
R2(config-cmap)#match protocol dns
R2(config-cmap)#match protocol ftp
R2(config-cmap)#match protocol https
R2(config-cmap)#match protocol http
R2(config-cmap)#match protocol tcp
R2(config-cmap)#match protocol udp
!
R2(config)#policy-map type inspect LAN-TO-INTERNET-POLICY
R2(config-pmap)#class type inspect LAN-ALLOWED-PROTOCOLS
R2(config-pmap-c)#inspect
R2(config-pmap)#class class-default
R2(config-pmap-c)#drop
!
R2(config)#zone-pair security ZP-LAN-TO-INTERNET source LAN destination INTERNET
R2(config-sec-zone-pair)# service-policy type inspect LAN-TO-INTERNET-POLICY
Step 8: Create two access-list, a class-map, policy-map, and zone-pair to allow traffic from the remote VPN router over the Internet into the self zone to establish the site-to-site VPN.
R1(config)#ip access-list extended ICMP
R1(config-ext-nacl)#permit icmp any any echo
R1(config-ext-nacl)#permit icmp any any echo-reply
R1(config-ext-nacl)#permit icmp any any traceroute
!
R1(config)#ip access-list extended ISAKMP_IPSEC
R1(config-ext-nacl)#permit udp any any eq isakmp
R1(config-ext-nacl)#permit ahp any any
R1(config-ext-nacl)#permit esp any any
R1(config-ext-nacl)#permit udp any any eq non500-isakmp
!
R1(config)#class-map type inspect match-all ICMP-POLICY
R1(config-cmap)#match access-group name ICMP
!
R1(config)#class-map type inspect match-all IPSEC-POLICY
R1(config-cmap)#match access-group name ISAKMP_IPSEC
!
R1(config)#policy-map type inspect INTERNET-TO-SELF-POLICY
R1(config-pmap)#class type inspect ICMP-POLICY
R1(config-pmap-c)#inspect
R1(config-pmap)#class type inspect IPSEC-POLICY
R1(config-pmap-c)#pass
R1(config-pmap)#class class-default
R1(config-pmap-c)#drop
!
R1(config)#zone-pair security ZP-INTERNET-TO-SELF source INTERNET destination self
R1(config-sec-zone-pair)#service-policy type inspect INTERNET-TO-SELF-POLICY
R2(config)#ip access-list extended ICMP
R2(config-ext-nacl)#permit icmp any any echo
R2(config-ext-nacl)#permit icmp any any echo-reply
R2(config-ext-nacl)#permit icmp any any traceroute
!
R2(config)#ip access-list extended ISAKMP_IPSEC
R2(config-ext-nacl)#permit udp any any eq isakmp
R2(config-ext-nacl)#permit ahp any any
R2(config-ext-nacl)#permit esp any any
R2(config-ext-nacl)#permit udp any any eq non500-isakmp
!
R2(config)#class-map type inspect match-all ICMP-POLICY
R2(config-cmap)#match access-group name ICMP
!
R2(config)#class-map type inspect match-all IPSEC-POLICY
R2(config-cmap)#match access-group name ISAKMP_IPSEC
!
R2(config)#policy-map type inspect INTERNET-TO-SELF-POLICY
R2(config-pmap)#class type inspect ICMP-POLICY
R2(config-pmap-c)#inspect
R2(config-pmap)#class type inspect IPSEC-POLICY
R2(config-pmap-c)#pass
R2(config-pmap)#class class-default
R2(config-pmap-c)#drop
!
R2(config)#zone-pair security ZP-INTERNET-TO-SELF source INTERNET destination self
R2(config-sec-zone-pair)#service-policy type inspect INTERNET-TO-SELF-POLICY
Step 9: Configure a policy-map and zone-pair to allow traffic from the local LAN to the site-to-site VPN. We will make use of the preexisting class-map called LAN-ALLOWED-PROTOCOLS.
R1(config)#policy-map type inspect S2SVPN-POLICY
R1(config-pmap)#class type inspect LAN-ALLOWED-PROTOCOLS
R1(config-pmap-c)#inspect
R1(config-pmap)#class class-default
R1(config-pmap-c)#drop
!
R1(config)#zone-pair security ZP-LAN-TO-S2SVPN source LAN destination S2SVPN
R1(config-sec-zone-pair)#service-policy type inspect S2SVPN-POLICY
R2(config)#policy-map type inspect S2SVPN-POLICY
R2(config-pmap)#class type inspect LAN-ALLOWED-PROTOCOLS
R2(config-pmap-c)#inspect
R2(config-pmap)#class class-default
R2(config-pmap-c)#drop
!
R2(config)#zone-pair security ZP-LAN-TO-S2SVPN source LAN destination S2SVPN
R2(config-sec-zone-pair)#service-policy type inspect S2SVPN-POLICY
Step 10: Configure a zone-pair to allow traffic from the site-to-site VPN to local LAN. We will make sure of the preexisting policy-map S2SVPN-POLICY and class-map LAN-ALLOWED-PROTOCOLS.
R1(config)#zone-pair security ZP-S2SVPN-TO-LAN source S2SVPN destination LAN
R1(config-sec-zone-pair)#service-policy type inspect S2SVPN-POLICY
R2(config)#zone-pair security ZP-S2SVPN-TO-LAN source S2SVPN destination LAN
R2(config-sec-zone-pair)#service-policy type inspect S2SVPN-POLICY
Verify the configuration
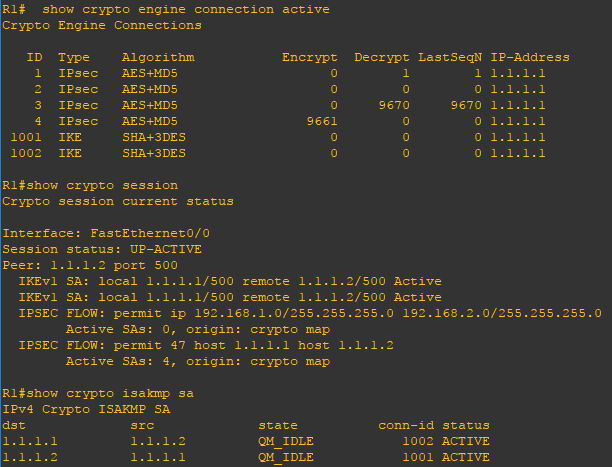
Now that the configuration is finished lets verify the configuration. Using the show crypto engine connection active, show crypto session, show crypto isakmp sa, and show crypto ipsec sa commands you can verify the VPN deployment. You can also use the show ip route and show ip eigrp neighbors command to verify dynamic routing is properly working. Lastly, use the ping command to verify connectivity from PC1 to ping PC2.

